This article describes yet another solution for a synchronous multiroom audio. It contains device demo, detailed hardware & communication & software design, HOW-TOs with the links to the configs, benefits and drawbacks of this solution, things that I want to improve and my feedback after using it.
Description
The audio player streams audio from a linux-based PC while been connected to the same WI-FI network and integrated into a Home Assistant (HA) server. No internet or cloud access is needed, only local WI-FI access. The audio player has following features:
- displayed play/stop toggle button
- displayed volume slider
- displayed current time, WI-FI signal level
- timeout to turn off display when no activities detected
- 2 physical buttons to control player and 1 button to reset
- remote control over HA
Short demo of the player: Start/stop commands (locally and over HA), volume adjustment, backlight turn on due to button press:
Player Wiring Diagram
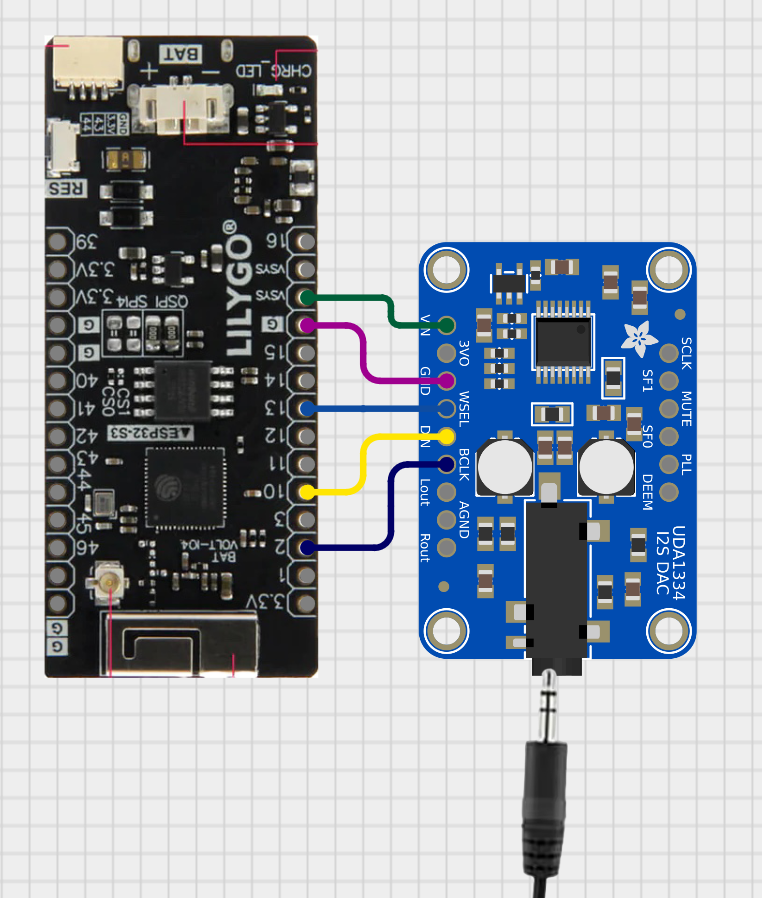
Player consists of the following elements:
- T-Display S3 (ESP32-S3 + 1.9 inch display, Version: H569)
- T-Display S3 Shell, Version: L929
- I2S DAC Audio Decoder UDA1334A (there are many versions on the market)
Communication diagram between components
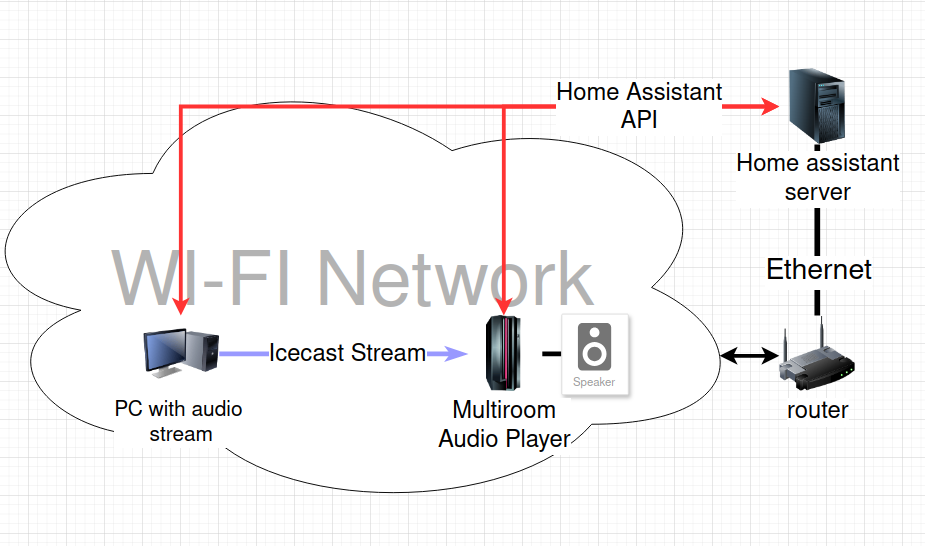
The list of the used software of the components
PC with Linux-based OS
Raspberry PI
Audio Player
HOW-TO set up linux-based PC as a streaming source
- make sure Pulse Audio is installed
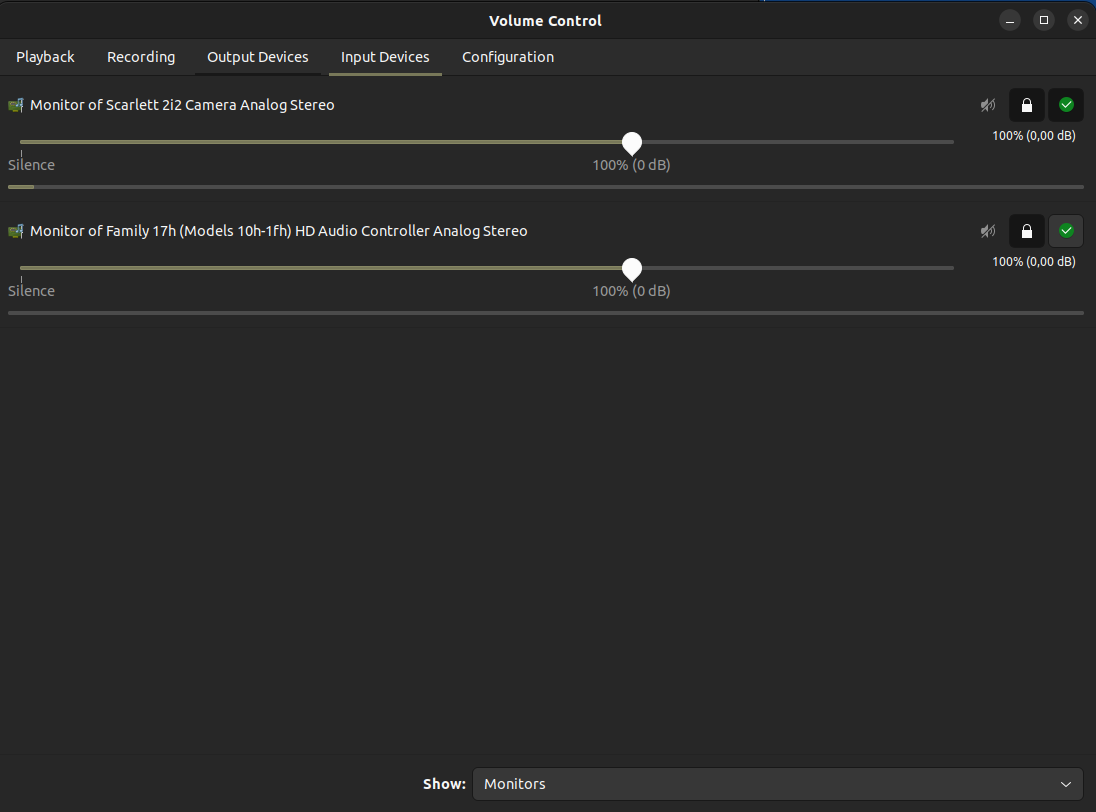
- open UI PulseAudio Volume Control app
- go to tab “Input Devices”, down in the menu select “Show: Monitors”, adjust the volume of your monitor channel
- choose your streaming device by clicking on “Set as Fallback” button
- install icecast2 service, responsible for converting PCM stream to icecast format
- edit icecast configuration file, (usually it’s located in /etc/icecast2/icecast.xml). You need to change <source-password> (pass for the tools, that stream the source), <admin-password> (admin pass), <admin-user> (any nickname), <hostname> (IP address of your PC), <port> (could be 8000) fields
- restart icecast:
sudo systemctl restart icecast2 - install butt streaming tool, for streaming icecast over http.
- open butt:
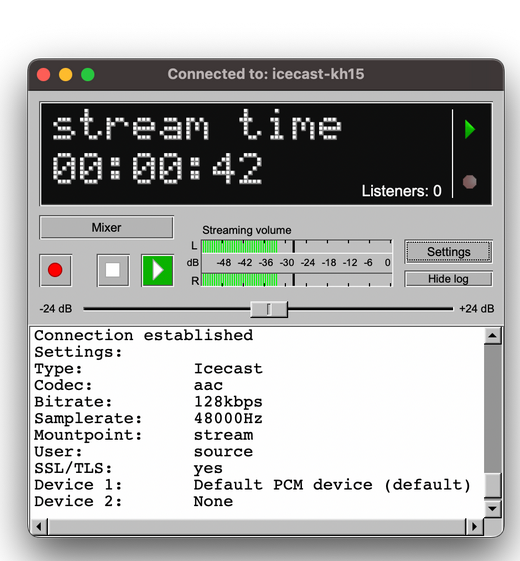
- Go to the Settings. on the “Main” tab choose “Add Server”.
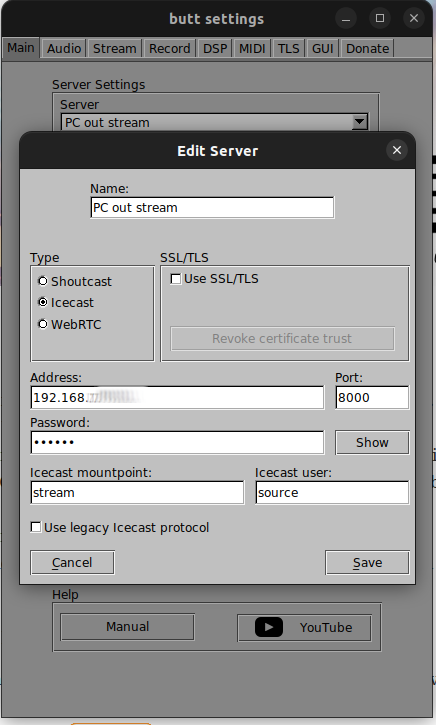
- Define “name”, select Server Type as “Icecast”, port, IP address and password should be equal to <port>, <hostname>, <source-password> from icecast configuration. “Icecast mountpoint:” is a postfix for stream URL, for example: http://<hostname>:<port>/<postfix>
HOW-TO set up & flash audio player for receiving audio stream
- Make sure you have all hardware components described above
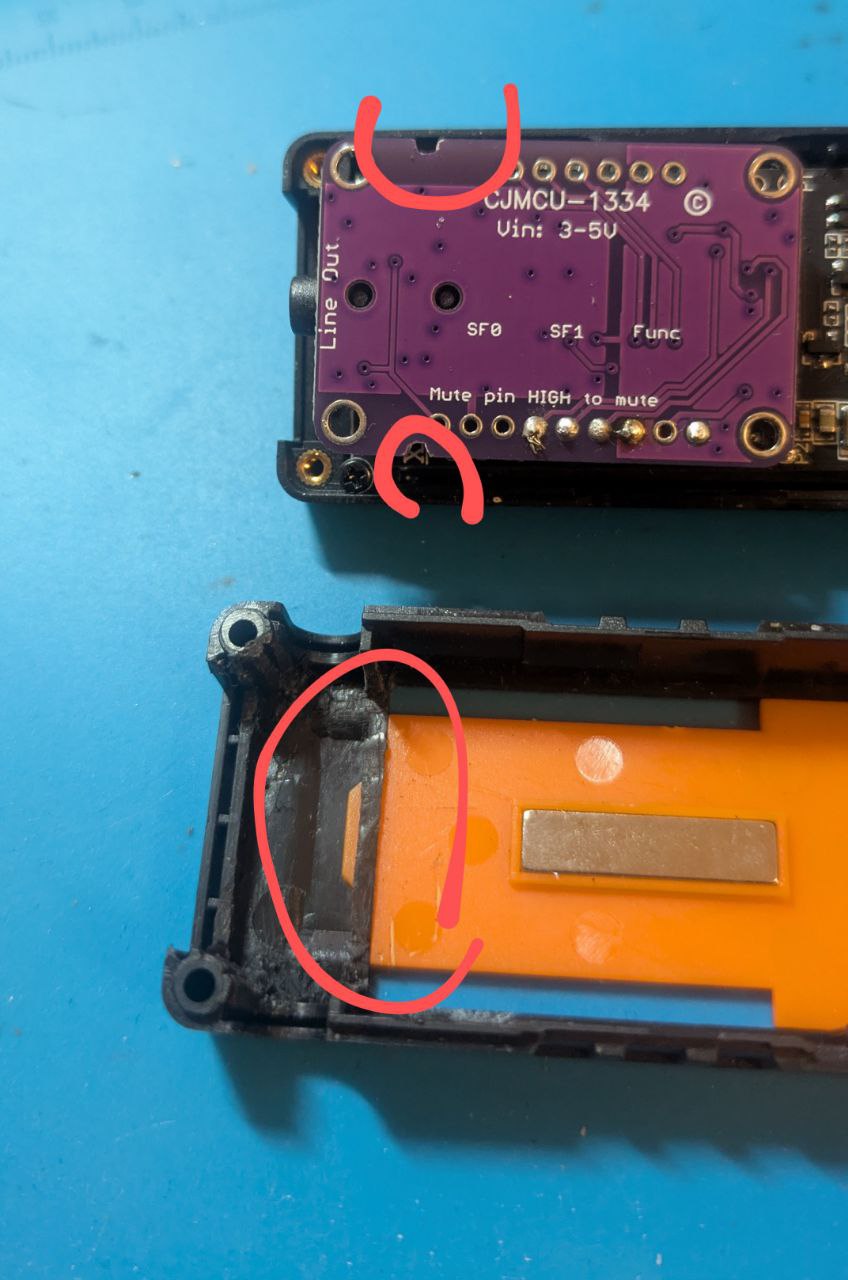
- to put DAC Decoder I had to adapt it and also adapt T-Display Shell, see the picture:
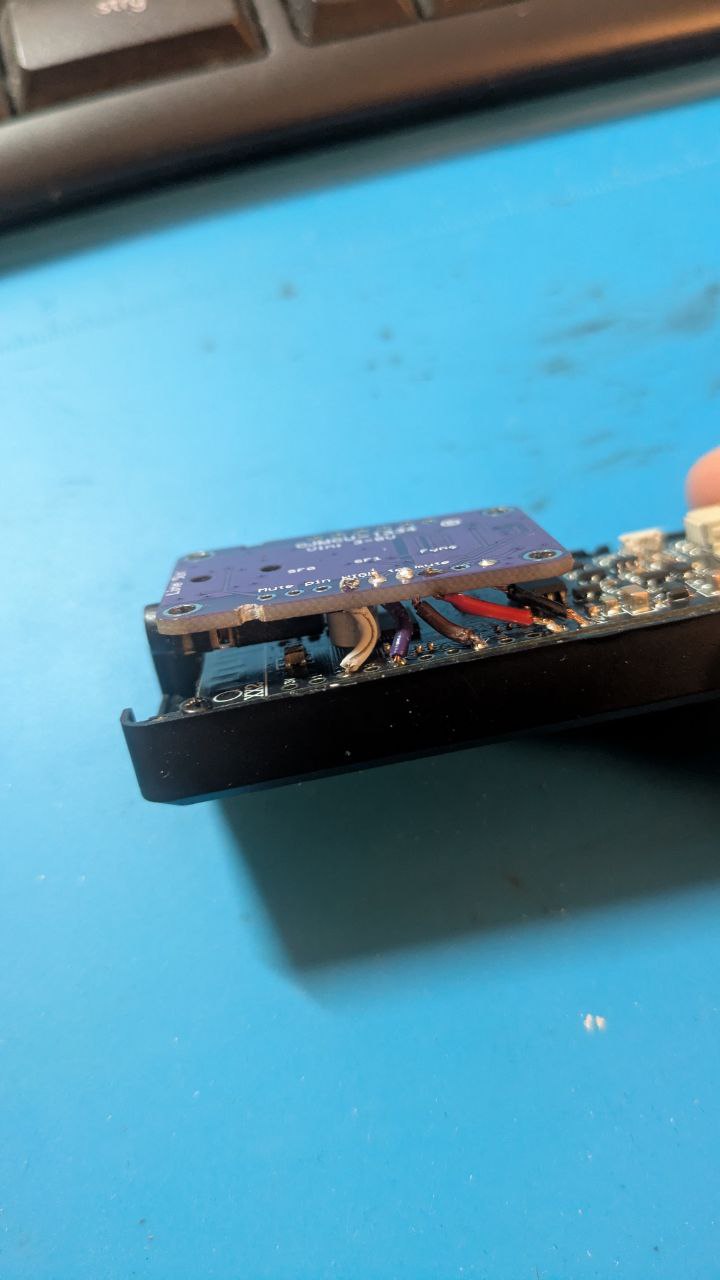
- do the soldering according to the diagram above. That’s how it looked for me:
- Install ESPhome IDE according to the guide
- connect and flash audio player using YAML config file:
esphome run ha-audio-sync-config.yamlYAML file is located here
IMPORTANT: In the config file specify SSID, WI-FI password and URL for the audio source stream, which is defined in butt
HOW-TO connect audio player to Home Assistant
Once the audio player is flashed with correct WI-FI credentials, it will be automatically discovered with Home Assistant platform. Enter convenient name for it.
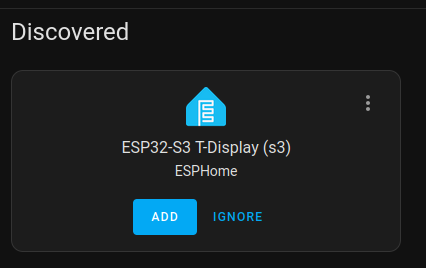
After adding the audio player to the list of the devices, find “Entity Id” of the player by going in to Settings -> ESPHome -> Entities -> “Name of your player” -> Settings.
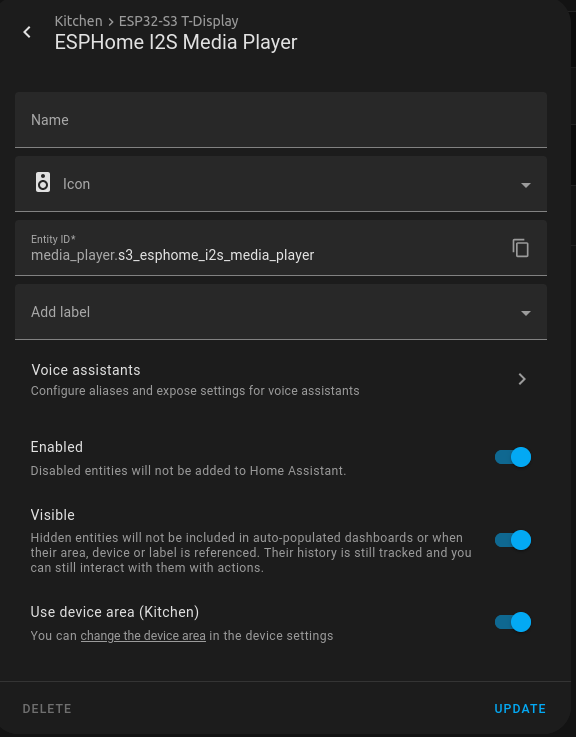
Copy it and replace default entity id (“media_player.s3_esphome_i2s_media_player”) with yours in YAML config file. The reflashing of the audio player with new configuration is required. It’s needed for state synchronization of the player in HA and the device.
Benefits and Drawbacks
- 🙂 does not require any code development
- 🙂 compare to Bluetooth-solution, it can work in one-to-many streaming configuration
- 🙂 compare to Bluetooth-solution, it can be controlled either locally or remotely over HA
- 🙂 compare to Bluetooth-solution, it’s active control, receiver decides when to start streaming, not the streaming source
- 🙂 compare to Bluetooth-solution, neither receiver nor sender is exposed to bluetooth network which can cause exteral unwanted connections
- 🙁 compare to Bluetooth-solution, audio stream is not normalized. When the origin audio is louder, receiver part gets louder audio (it can be fixed)
- 🙁 requires basic soldering skills
- 🙁 it’s only for HA users, it requires basic knowledge of defining new services in HA
- 🙁 the audio is not really synchronous. From the other point of view, I cannot be in the few rooms simultaneously, so I don’t need really need to have fully synchronous audio
- 🙁 the streaming part(linux-based PC) is not yet cross-platform, although it can be configured for Windows and MacOS too
Things To Improve
After using the player for 2 weeks I got some requests for this device:
- (if there will be requests) add HOW-TO for streaming side on Windows or MacOS
- (if there will be requests) add solution without LCD display, just with the buttons
- normalized audio on receiver, so sound level on streaming part is not dependend on receiver part
- add docker file for setting-up streaming side
- add opportunity to control the sound level of streaming side from the audio player
- improve state synchronization between HA and the player (If the device restarted I cannot start to listen stream from HA. But it can be fixed)
My Feedback
First things first, it solved my problem, so the device turn to be a useful, at least for me. The device is small and can be taped on a flat wall or on a shelf (that’s what I did). The cable placing is okay. Would be better to have both connected from one side (although for such a small device it’s not really possible).
For the negative sides, 2 times I observed that the audio stuck after 2-3 minutes of playing. Once there was some noise in the stream (most probably related to the poor WI-FI connection). Simple device restart fixed all those cases.
This post is auto generated from the repository: https://github.com/bespsm/techrecords-org.git
If you find a mistake in this article, please use Contact page.
